A REALLY Tasty Winter Squash Soup

Enjoy the season's bounty with this delicious winter squash soup

Enjoy the season’s bounty with this delicious winter squash soup

I have several winter squash remaining in storage from my last few CSA shares, and the fall weather is perfect for soup, so I decided to make a pot of delicious winter squash soup for dinner last night. I’ve made winter squash soup many times before but I wanted to keep the seasonings simple, and I wanted it to have a creamy texture without adding heavy cream or butter. I referenced several recipes and found a good “foundation” recipe by Alice Waters in her Chez Panisse Vegetables cookbook.
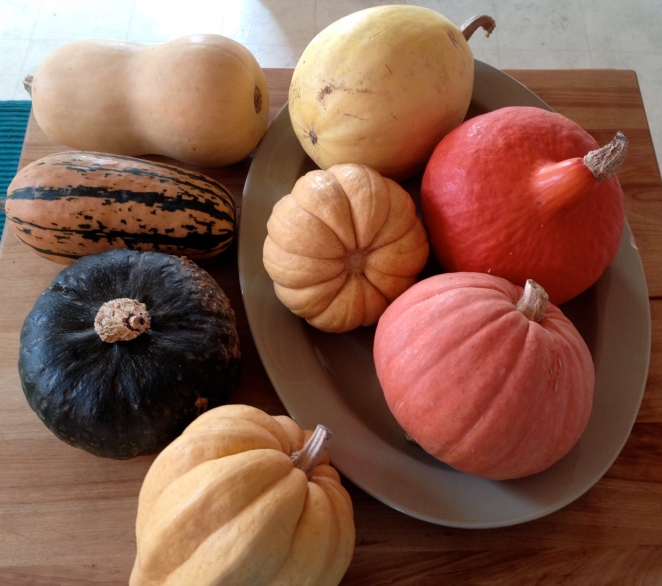
Winter squash (From top counter clockwise): Butternut, Delicata, Buttercup (kabocha), Thelma Sanders (Acorn),  Gold Nugget,  Red Kuri (kabocha) and Spaghetti squash

Winter squash (From top counter clockwise): Butternut, Delicata, Buttercup (kabocha), Thelma Sanders (Acorn), Gold Nugget, Red Kuri (kabocha) and Spaghetti squash

The following recipe is my take on Winter Squash Soup and it turned out very tasty.  The choice to use a more starchy deep orange Buttercup with a lighter, milder tasting Thelma Sanders led to a perfectly balanced soup both in taste and texture.  This silky satisfying soup is perfect paired with hard cider and a side of toasted brioche with butter.  To make this soup vegan, simply replace the chicken stock with vegetable stock.

Winter Squash Soup

  • 2 whole winter squash (I used the green Buttercup and the beige Thelma Sanders), halved, seeds removed and cut in wedges
  • Olive oil (2-3 tablespoons total)
  • 1 medium to large onion, peeled and chopped
  • 4 garlic cloves, peeled and chopped
  • 6-7 unsalted raw or roasted cashews (about a handful)
  • ¼ tsp red pepper flakes
  • 1/8 tsp ground nutmeg
  • ¼ tsp dried thyme
  • 1 quart chicken stock
  • 1 cup water
  • sea salt and black pepper to taste

Preheat oven to 350F. Place squash cubes on a parchment paper lined roasting pan and drizzle about 1 1/2 tablespoons olive oil over the squash. Roast squash cubes, flesh side down, until completely tender, about 40 minutes. Set aside and let cool.

Heat the remaining olive oil in a heavy stockpot, add the onions, and saute over medium heat until the onions are slightly browned and softened, about 10 minutes. Add garlic, thyme, red pepper flakes, cashews and nutmeg and stir to warm spices.

Scoop out the squash flesh with a large spoon to remove the flesh from the skins. Add the flesh to the pot and stir. Discard skins. Add chicken stock plus a cup of water and stir using a potato masher to break up lumps of roasted flesh. Cover and simmer over medium low heat for about 20 minutes. Remove from heat and cool for about 2-3 minutes, to avoid transferring boiling hot soup to the blender.

Using a soup ladle, carefully transfer the mixture (in two batches) to a blender and puree for 60 seconds. Return the soup puree to the pot and heat slowly on medium heat. Taste for seasoning. I added about one teaspoon of sea salt and a few grinds of black pepper from a pepper mill. Serve hot with garnishes such as fresh, chopped parsley or micro greens. Add crunchy croutons if desired.

CSA Week 18: Final Box of Fall

Cassius and Roxy will miss posing for their weekly CSA portrait

Cassius and Roxy will miss posing for their weekly CSA portrait

Last week was the last share in Sol to Seed Farm‘s 2013 CSA Season. J and I paid two payments of $250 for 18 weekly shares of organic produce grown by one farm here in King County. That’s about $28 per week. We started collecting the boxes on June 26th from Grand Central Baking Co. and every week, the bakery has given us a free loaf of bread with our box. I really love this arrangement, and I hope this option is available next year.

Bryce at Grand Central Baking Co taking time away from the espresso machine to hand me my box

Bryce at Grand Central Baking Co taking time away from the espresso machine to hand me my box

It’s almost been one full week since I picked up the last CSA box. All of these items will keep very well in dry, cool storage without processing (freezing, canning, etc). Last week’s share was a fine example of fall produce, including:

Winter Squash
– Honeyboat Delicata
– Sugar Dumpling
– Thelma Sanders
Apples from trees that are estimated to be 85-90 years old!
Onions
Potatoes
Carrots
…and a free loaf of Rustic Multigrain Bread

Farmer Matt recently shared this note with subscribers: “This year was, in many respects, one of the most challenging of our 6 years in the business of growing food. In the world of farming there is no such thing as certainty and even with one of the most amazing summers – in terms of weather – there is just no way to predict what challenges will arise.” Whether you join a CSA, shop regularly at your local farmers market, visit farm stand regularly, or just choose authentically local produce, meat, dairy at your grocery stores, restaurants or online markets, remember that when you support a local farm like Sol to Seed, you are directly helping to preserve farmland close to home, responsible farming practices and wholesome traditions.

I don’t have a recipe this week but I will be posting on and off throughout the season. I hope you have enjoyed seeing photos of my silly dogs and perhaps you’ve learned a thing or two. Thank you!

CSA Week 17: Braised Cabbage with Cider

I was wrong. This is not the last week of Sol to Seed Farm’s 2013 CSA season. My CSA related postings will end next week. Here’s what I picked up today:

Cassius and Roxy are in disbelief about the tomatoes in this week's share.

Cassius and Roxy are in disbelief about the tomatoes in this week’s share.


  • Winter Squash (Buttercup (kabocha) and Butternut)
  • Bosc Pears
  • Onions
  • Peppers
  • Red Cabbage
  • Tomatoes (yes, tomatoes in October!)
  • Collards
  • Parsley
  • …and a free loaf of Multigrain Wheat Bread from Grand Central Baking Co.

I like this recipe for braised cabbage with cider. It’s based on Alton Brown’s recipe that I found online a few weeks ago. I barely tasted the caraway seeds so I suppose they can be an optional ingredient if you can’t find them. I added about a 1/4 of an onion in with the apples during the saute plus a tablespoon of apple cider vinegar to the braising liquid. This is a great side dish to pork chops or sausages.

Braised Cabbage with Cider
  • 2 tablespoons butter
  • 1 medium apple, peeled, cored, and cubed (Granny Smith or any tart baking apple)
  • 1 pint unfiltered apple juice
  • 1/4 large onion, peeled and chopped
  • 1/4-teaspoon caraway seeds
  • 1 1/2 teaspoons kosher salt
  • Freshly ground black pepper
  • 1/2 head of red cabbage, shredded
Heat the butter in a pan over medium heat. Add the apple and onion to the pan and cook until lightly browned. Increase the heat to high and add the apple juice, caraway seeds, salt, pepper and cabbage to the pan. Cover the pan and shake to toss the cabbage to coat. Reduce the heat to low and cook for 20 minutes.
Braised Cabbage with Cider and a Pork Chop with parsley garlic butter.

Braised cabbage with cider and a pork chop with a compound butter made with black mustard seed garlic and parsley.

CSA Week 16: Holy Trinity of Cajun Cooking

Cassius and Roxy with this week's CSA share.

Cassius and Roxy with this week’s CSA share.

It’s week sixteen (not 17 as I originally posted) of my Sol to Seed Farm CSA share, and in TWO weeks we’re done for the season.  I’m getting quite a nice collection of winter squash that I’m using as fall ornaments until I’m ready to cook them. This week’s box included:

Winter Squash
– Thelma Sanders Acorn
– Gold Nugget
Carrots
Onions
Potatoes
Red Russian Kale
Peppers
and a free Semolina Baguette from Grand Central Baking Co.
 

It’s been one week since I returned from a short trip to New Mexico where I ate my fill of Northern New Mexican food: green chile rellenos, sopapillas, rice and beans.  By the time Wednesday rolled around, I was craving the flavors of Louisiana, on the opposite side of Texas from New Mexico.  I had a green bell pepper left over from a previous CSA share and plenty of onions so I had 2 of the 3 ingredients for Louisiana’s “Holy Trinity” – a mixture of sauteed onions, bell peppers and celery – the base for many savory Cajun dishes such as Gumbo and Jambalaya. I had some chorizo from Link Lab Artisan Meats in the freezer but no tasso or andouille sausage, so I made a simple sausage and rice dish and it was delicious and satisfying.  This recipe isn’t authentic, but it satisfied a craving nonetheless. It was simple and quick to make using several ingredients from my CSA share and other pantry staples.  Nothing fancy here- this is just a good weeknight meal.

Cajun-Inspired Sausage and Rice

  • 1 medium onion, peeled and diced
  • 1-2 Bell or sweet peppers (green or yellow), halved, seeded, cored and diced
  • 2 celery ribs, diced
  • 2 medium carrots, peeled and diced
  • 2 cloves garlic, peeled and minced
  • 2 tablespoons olive oil
  • 1 lb. sausage (links or bulk) preferably andouille, tasso or chorizo ( I use Link Lab because they source humanely raised meats from local farms and maintain a small scale, very high quality, USDA inspected facility)
  • 1 cup white long grain rice
  • 2 cups vegetable or chicken stock
  • 1 teaspoon cayenne
  • 1 teaspoon dried thyme
  • 1 bay leaf
  • sea salt and plenty of freshly ground pepper to taste
  • 1/4 cup chopped parsley
  • Louisiana hot sauce such as Crystal, Red Devil or Tabasco

Heat oil in a large saute pan and add the sausage. Break up the links (if using) with the side of your spoon and keep moving the meat around the pan and cook until browned with some caramelization. Transfer the meat from the pan with a slotted spoon to a paper towel-lined plate and set aside. Add the onions to the pan with the remaining oil and fry for about a minute until translucent. Then add the celery, peppers, garlic and carrots and stir to keep the ingredients from burning and cook until fork tender, about 2-3 minutes. Add the rice then stir to coat and slightly toast the grains. Add the thyme, bay leaf and cayenne pepper and the reserved sausage. Then add the broth, stir once and bring to a boil before lowering the heat and covering for about 25 minutes. Be careful not to scorch the rice.

Fluff the rice with a fork and taste for seasoning before adding salt and plenty of ground black pepper. Remove and discard the bay leaf. Sprinkle chopped parsley over the finished dish and stir to incorporate for color and serve with a green salad.  Be sure to keep some good quality Louisiana hot pepper sauce on hand for an extra piquant flavor.

Honestly, I’ve been craving Cajun and Creole food ever since my favorite food truck purveyor Matthew Lewis opened Where Ya At Matt?  He has delayed the opening of his new Restaurant Roux all year. Originally it was set to open last spring, then it was August and now it’s set to open this month and we’re still waiting…tick-tock.  I also follow food news from Poppy Tooker who just published her new book Louisiana Eats! Poppy has been on the talk show circuit doing cooking demos and making America drool. Enjoy!

Tomatillo and Chile Pork Stew

Tomatillos from last week's CSA Share

Tomatillos from last week’s CSA Share

Before I pick up this week’s CSA box, I want to quickly share this recipe since it uses the tomatillos, potatoes, onions and hot chiles from last week’s box. Since I just got back from a trip to New Mexico, I had last week’s produce to use. I was ready to bring the southwestern aromas to my Seattle kitchen so I researched recipes for both green chile stew and chile verde and decided to use Martha Stewart’s recipe for Green Chile and Tomatillo Pork Stew as my guide. I have made significant changes to the recipe based on what I had on hand, but it turned out delicious. My recipe uses a lot more hot chile, but it’s not as spicy as you might think because I removed all seeds and veins and roasted them before adding to the stew. For spicy food lovers like J and I, this stew obtained a perfect heat for our palates. But if you don’t like hot chile, you may use milder green Anaheim chiles instead. Do not use Bell peppers.


Tomatillo and Chile Pork Stew

Tomatillo and Chile Pork Stew

Tomatillo and Chile Pork Stew

Serves 4-6

  • 7 small mixed jalapeno and serrano chiles (red and green), split lengthwise, seeds and ribs removed if you don’t want a lot of heat
  • 1 lb tomatillos, husked and quartered
  • 2 cups chicken stock, plus more if needed
  • 3 tablespoons sunflower oil
  • 2 pork loin chops, cubed
  • 1 1/2 medium white onions peeled and coarsely chopped
  • 4 garlic cloves, peeled
  • 2 medium white potatoes, peeled and quartered
  • 1 tablespoon ground cumin
  • 1 teaspoon sea salt (more to taste)
  • Freshly ground black pepper

Preheat oven to 350F.  Place the chiles on a parchment paper lined roasting pan. Drizzle about a tablespoon of sunflower oil and toss chiles with a spoon (wear vinyl or latex gloves if hand-tossing). Slide the pan into the oven and roast until browned (but not burnt) for about 40 minutes.  Set aside.

Combine tomatillos and 1/4 cup of the chicken stock in a large saucepan. Simmer over medium heat and cook until the tomatillo begins to break down and get soft. Remove from heat.

In a separate saucepan, boil the potatoes in enough water to cover them (about 2 cups). Boil until tender then drain and set aside.

Heat a large, oven-safe Dutch oven over medium-high heat and add 2 tablespoons of sunflower oil. Sprinkle salt and pepper over pork cubes before adding to the hot pan. Brown well on all sides. Remove pork from pan and reserve the residual oil for the sauce. There won’t be much oil left from cooked loin chops.

Add tomatillo, chiles, onion, and garlic to food processor and puree until smooth.

Return the Dutch oven to medium heat. Add cumin to the hot oil and stir quickly to heat but be careful not to scorch.

Then add about 1 cup of the stock to break up the brown bits on the bottom of the pan.  Add the puree and the rest of chicken stock to pot and stir to combine.

Add the pork cubes back into the Dutch oven. Add remaining stock. Cover and cook on medium low for about an hour. Add the cooked potato and stir into the stew. Simmer for about 5 more minutes. Taste for seasoning and add salt and freshly ground pepper if needed.

Serve pork stew in large bowls, and top with garnishes such as cilantro, avocado, queso fresco, jack cheese. Serve with heated corn tortillas on the side.

Roasted Chiles

Roasted Chiles

CSA Week 15: Winter Squash

Last Wednesday I collected my fifteenth (not 16- apparently I lost count when I went out of town) Sol to Seed Farm CSA share from Grand Central Baking Co the day before leaving for a trip to see family and friends in New Mexico. That also meant that I didn’t cook at home until Sunday. Since then, I have roasted and stored the sweet peppers and am making a green chili stew with the remaining chilies, potatoes, onions and tomatillos. Instead of making kimchi, I may end up using the Napa in a quick stir-fry. Last week’s box included:

Potatoes – 2.5/lbs
Winter Squash – Red Kuri (kabocha)
Beets
Tomatillos – 1/lb
Onions
More Peppers!
– hot mix
– sweet mix
Napa Cabbage
…and a free loaf of Goldendale Wheat Bread
The dogs enduring a quick photo shoot before I head to the airport

The dogs enduring a quick photo shoot before I head to the airport

Correctly preparing and storing whole winter squash is misunderstood by even experienced cooks. Last year, a local hospital that I help with local food procurement (through the Farm to Table program), had to discard twenty large bags of raw, cubed winter squash because they missed the critical step of cooking it before freezing. Compared to summer squash, winter squash is tough on the outside to protect it from the elements, while the starchy interior “flesh” cells are weak. Freezing raw squash results in messy and inedible sludge when thawed, but summer squash can be frozen raw successfully. Always remember to bake or steam winter squash before freezing. The thawed pulp can be added to soups, pasta, baked goods and casseroles later.

If you plan to eat the squash this season, you’ll be pleased to know that winter squash keeps very well uncut, as long as it’s stored in a cool, dry environment. I’ve saved a few small pumpkins last year — Acorn and Delicata squash — for months unrefrigerated on my counter. Most winter squash have a very tough peel which make it difficult to cut, so please always use a very sharp knife and be very careful. Some varieties of winter squash have very thin (but still tough to cut raw) but edible peels, such as last week’s Delicata and Sugar Dumpling. For these squash varieties, it’s not necessary to peel the squash before cooking and eating. While there are recipes that call for raw winter squash, I am not a fan. I prefer winter squash roasted or braised.

Farmer Matt explained a little bit about the red kuri squash in his weekly email to CSA subscribers:

“The red kuri winter squash is typically thought of as a Japanese squash similar to kabocha, although not actually a kabocha – it is often referred to as hokkaido squash. They have an incredibly full, sweet flavor and the flesh is very dry. They are THE BEST soup squash in our humble opinion, however, are also wonderful when baked like a traditional table squash (salt, pepper and butter).”

A few nights ago I roasted the Sugar Dumpling squash from last week’s box and ate it as a side dish to pan-fried grass-fed, organic steak from Skagit River Ranch.  Again, the recipes I choose to share with readers on this blog are meant to be very simple and quick to prepare, so that cooks of all levels can feel comfortable executing for weeknight meals without a lot of fuss. Generally winter squash is high in carbohydrates so if you are adhering to a low-carb/low-sugar diet, you should eat sparingly. Winter squash is also high in Vitamin A and C, which the body needs a lot of in the winter time.

Roasted Sugar Dumpling Squash

Roasted Sugar Dumpling Squash

Cumin-Scented Sugar Dumpling (can also use Delicata the same way)

  • 1 Sugar Dumpling squash, cut in half, seeds removed and sliced in 1/2 inch wedges
  • 1 teaspoon olive oil
  • 1/2 teaspoon sea salt or Kosher salt
  • 1/2 teaspoon ground cumin

Preheat oven to 350 F.  Arrange squash slices on a parchment paper lined baking sheet. Drizzle olive oil over the slices then sprinkle the seasonings before tossing with clean hands to coat. Bake in the oven for 40 minutes or until browned but not burnt.  Remove from heat and transfer to a serving bowl.

Two more weeks of this year’s CSA!

CSA Week 13: Seattle’s Year of the Padron

Cassius, Roxy and the contents of the 12th week's CSA Box

Cassius, Roxy and the contents of the 12th week’s CSA Box

This Weeks Box:

 
Padrons
Mild/Sweet Pepper Mix – more Padrons!
Hot Pepper Mix
Potatoes
Red Cabbage
Collard Greens
Tomatoes
Melon
Winter Squash – Thelma Sanders
Parsley
…and a petite como loaf from Grand Central Baking Co.


It’s now week 12 of this summer’s CSA and I have to admit I’ve gotten more peppers this year than I ever imagined possible. Last year we had a surplus of onions, but they stored so well I didn’t have to buy another onion until the following January. This year’s diverse pepper crop at Sol to Seed Farm was phenomenal and so I’ve been roasting and freezing all that we cannot consume fresh. There were so many different varieties of peppers — hot chiles to mild frying peppers like Pimientos de Padron or Padron peppers.

My Padron Experience Began

In 2004 when we moved from New York City to Portland, I first tasted Padron peppers at the Portland Farmers Market. Viridian Farm had samples of a the peppers fried in olive oil and sprinkled with flaky salt. From that day forward I was on the lookout for more Padrons. At the time only Viridian Farm and their market following seemed to know or care about them.

Fast forward to 2008 and we’re living in Seattle. I hadn’t seen Padron peppers sold anywhere since leaving Portland and I missed them. Then one day I spotted them at Whole Foods Market. These suspicious looking Padron peppers were produced in California, under a brand synonymous with year-round cherry tomatoes. Wanting to relive the taste experience, I bought a clamshell of Padrons and went home and fried them. Sure they were edible, but they lacked flavor and were a little tough. I decided not to buy anymore from the store. I hadn’t tasted a decent Padron since leaving Portland in 2006, that is until last summer (2012) when Sol to Seed Farm shared their real farm fresh Padrons at week 8!

Padrons almost everywhere this year in Seattle- on trendy restaurant menus, at the grocery stores and at the farmers markets. Last week I made a frittata with sauteed mushrooms, Padron peppers and sheep’s milk cheese. Padrons are great fried and roasted but that sprinkling of flaky salt is required in my book. I even pickled some thinking they might make good salad peppers but they weren’t amazing so I probably won’t try that again. Below you’ll see a photo of last night’s dinner. I added Padron peppers to a red beet and carrot roast and it turned out wonderful. Still my favorite way to eat Padrons is simply fried in olive oil and sprinkled with flaked sea salt. I can’t eat just one.

Padrons were declared a menu trend in 2012 Portland Monthly. I’m glad Seattle has joined me in appreciating Padrons.

Pork Chop with Roasted Beets, Carrots,  Padron Peppers

Pork Chop with Roasted Beets, Carrots, Padron Peppers

CSA Week 12: Cauliflower, Beans, Beets and Carrots

CSA Week 12: Cauliflower!

CSA Week 12: Cauliflower

The temperatures have dropped and the rain is back. Farmer Matt of Sol to Seed farm harvested another huge share of peppers last week, meaning each CSA box contained another three pounds of beautiful peppers. Again, I roasted them and packed them away in the freezer for future stews and pasta sauces. It’s a good thing that peppers freeze easily or I’d be handing out freebies to my neighbors.  The cauliflower heads are big and beautiful- the variety is colored purple at the core.

I attended an out of state conference last week, but I managed to pick-up my share before I left. That means the box sat idle for a few days, with the exception of salad greens which J consumed.

Last week’s box included:
Peppers – 3 lbs
Cauliflower (2 heads)
Green/Yellow Beans
Salad Mix
Cucumber
Carrots
Beets
….and a loaf of Sourdough Bread from Grand Central Baking Co.

Starting today J and I are avoiding sugar and most starches/carbohydrates (e.g. I’m allowing carrots and beans) for a few weeks to shed the weight we’ve both gained back this summer. We’ll be drinking lots of water and tea, and eating mostly vegetables and fruits, lean protein and dairy in five small meals per day. Last year I lost thirty pounds adhering to this diet for five months and the CSA share really came in handy.

Here are some recipes I’ll be making this week using the contents of my CSA share:

Cauliflower Steaks and Cauliflower Puree

Roasted Beets, Carrots and Padron Peppers (with Pork Chops from Skagit River Ranch)

Pork Chop with Roasted Beets, Carrots,  Padron Peppers

Pork Chop with Roasted Beets, Carrots, Padron Peppers

Green Beans and Crisp Shallots

IMG_0598 IMG_0601

Calabacitas (made without the corn this time)

….and lots of salads with the salad mix and cucumber. As for the bread, I’ll be making breadcrumbs and cubes and storing them in the deep freezer to use up during the holidays.

Finally, Sol to Seed Farm reminded us that there were only 6 (not 8) more weeks left in this year’s CSA season. His following note tells why:

“This year instead of raising the box price, we started the CSA a couple weeks later than normal and shortened the time to 18 weeks. We struggled with this back in January but had to do something to help cover the cost of fuel, boxes and time we had been losing the past couple of seasons – by starting later we were able to get some more variety in the early boxes. We thought we’d give you an idea of what you’ve received to this point, as it compares to market prices: After 12 weeks you have received $415 worth of produce which comes out to $34.50 per box. Over an 18 week season that ends up being $621 worth of food! Not a bad deal for your $500 investment.”

It’s a bargain for us because I:

1) enjoy cooking and can usually make time to prepare meals

2) eat at home most nights

3) enjoy all kinds of vegetables and am open to new tastes

4) usually cook 1-2 meals per day for myself and at least 1 other person

CSA Week 11: Three Pound Bag of Peppers

I really enjoy claiming my CSA share each week from Sol to Seed Farm.  It’s now week 11 of this year’s 20-week farm share and this box, like every box, represents what’s grown in Western Washington and in season now in early September.  This week’s box includes:
Cassius and Roxy enjoy CSA Week 11

Cassius and Roxy enjoy CSA Week 11

Garlic
Sweet Peppers, Assorted – 3 lbs
Rainbow Chard
Onions
Broccoli
Cauliflower
Honeydew and Cantaloupe Melon
Zucchini
…and a free loaf of Goldendale Bread from Grand Central Baking Co
While I’m very thankful for this beautiful, locally grown produce, there are only two of us to eat it at our house.  I learned how to cook from observing my mom, dad, relatives and other home cooks I’ve met on my life’s journey.  I had some culinary training as well as “on the job” training. I’m inspired to cook from watching PBS cooking shows (always have).  Nowadays when I’m looking for a different approach to cooking and new recipes, I reference the wisdom of CSA food bloggers throughout the country who are busy chronicling their lives and what they do with the contents of their local CSA shares. In fact, In Her Chucks (a delightful blog) maintains a CSA blogger’s “recipe round-up” on InLinkz each week where CSA bloggers are invited to add web-links to share posts with recipes.  I’ve been sharing my Brinylife blogs for about two years and have connected with other like-minded (and like- hearted) people from all over the country–those who are committed to telling a story of what eating local means to them, but often sharing a personal snapshot of “the good life” from their perch.  It’s never pretentious.
3 lbs. of peppers…what to do?
IMG_0569
This week I have a huge three- pound bag of sweet peppers in addition to last week’s uneaten haul of sweet peppers.  One can only make so much peperonata. I’m saving a few bell peppers back for eating raw with salads and I’m roasting the rest.  Roasted sweet peppers can be tossed into pasta, atop sandwiches (tuna melts are great with roasted peppers), or mixed into grain salads for color and added brightness.  It’s easy to roast peppers and store in the refrigerator.
Roasted Sweet Peppers
  • 3-4 lbs. of sweet peppers, halved, stems and seeds removed
  • Olive oil
  • Sea salt and freshly ground black pepper
IMG_0580
 
Preheat the oven to 350F.  Place a sheet of parchment paper on a roasting pan and then place the pepper halves on top of the paper.  Drizzle with olive oil and season with salt and pepper.  Roast until peppers are dark brown or blackened around the edges, about 1 hour.  Turn the pan 180 degrees after about thirty minutes to cook evenly.  Let cool.
Chopped roasted peppers  were included in a pizza tonight

Chopped roasted peppers were included in a pizza tonight

For an extra flavorful twist, pack roasted peppers into a Mason jar. Bring to boil 1 part water and 1 part red wine vinegar and a teaspoon of sea salt (sliced garlic for more pungency) and pour over roasted peppers.  Wait until completely cooled before placing in the refrigerator.  This can be stored for up to two weeks chilled.
For some reason, Cassius thinks he would like some roasted peppers....hmmm, always research what foods are safe to feed your pet before treating. Green and red peppers can be consumed by dogs safely

For some reason, Cassius thinks he would like some roasted peppers….hmmm, always research what foods are safe to feed your pet before treating. Green and red peppers can be consumed by dogs safely

CSA Week 10: Salsa Verde

It’s Labor Day weekend and J and I both have a three-day weekend.  We didn’t plan a weekend getaway but we did agree to organize a few rooms in the house. Organizing the refrigerator is also on my list.  Fun times!  I’ve got a surplus of sweet peppers that I will grill and freeze.  I have also got extra slicing cucumbers which I will use in a chilled gazpacho because it’s still warm enough for cold soup.

I picked up my tenth CSA share from Sol to Seed Farm on Wednesday. It’s the half-way point of the season. Only ten more boxes to go! This week’s box included:

Cassius and Roxy with CSA Share Week 10-

Cassius and Roxy with CSA Share Week 10

Peppers: 
Sweet/Mild Mix
Padrons/Shishito
Poblano
Hot Mix
Onions
Carrots
Dragons’ Tongue Bean
Summer Squash
Cucumbers
Tomatillos
and an Olive Loaf from Grand Central Baking Co.

Again, there are lots of peppers, but there are tomatillos for the first time this year. In fact, this box included all the ingredients needed to make a really fresh salsa verde, except for the garlic, tomatoes, lime and cilantro.  I used tomatoes from my garden and made a trip to the store for the rest.  I suggest making this recipe the night before serving.  It’s gets even better after sitting overnight in the refrigerator. It will last for about a week covered in the refrigerator.

Salsa Verde

Makes about 2 cups

  • 1 lb. tomatillos, husks removed, rinsed (larger ones sliced in half)
  • 3 small or 2 medium jalapeno chiles, sliced in half, cored and seeded
  • 3-4 cherry tomatoes or 1 small ripe tomato (added for sweetness and color)
  • 1 teaspoon olive oil
  • 1 cup cilantro leaves, stems removed
  • 1/2-1 clove garlic (to taste)
  • juice of one lime
  • 1/4 white onion, finely diced and rinsed under cold water
  • sea salt and freshly ground black pepper to taste

Preheat oven to 350 F. In a roasting pan combine tomatillos, chiles and tomatoes and toss with a teaspoon of olive oil, a pinch of salt and freshly ground pepper.  Roast until the edges are browned, about 30-40 minutes.  Remove from heat and set aside to cool.

In the bowl of a food processor, combine cilantro, lime and garlic and process until the leaves have been minced. Add the cooled roasted vegetables and process until fully blended, about 20-30 seconds, pausing once to scrape the sides.  Add the minced onion and pulse twice just to blend.  Taste for seasoning and add more salt and pepper if needed.  Pulse again and then transfer the salsa to a bowl and cover overnight in the refrigerator to let flavors develop.  You can enjoy this salsa with chips or reheat it to sauce meats, vegetables or rice dishes.

Salsa Verde

Salsa Verde